Masks, masks, masks.

It seems like everyone who sews is making masks right now. I resisted as long as I could because

1) I have masks. I’ve been wearing masks for chemical smells for several years now,

2) If everyone else is making masks, then I don’t need to. There are plenty of places for people to get them, and

3) Because I wear masks, I know how difficult it is for them to fit properly and there is no one pattern that is one size fits all.

BUT, I caved and made one for my mom (which she won’t wear because even thought I followed a pattern, it doesn’t fit correctly). That was disappointing.

I tried again and made a couple for my godchildren. The experience of bringing them their masks was completely delightful. They put them on right away. Little A said, “Are those rockets? This is my FAVORITE MASK!”

Leave it to children to love the weird gifts you give them! ❤️

The last mask I made was for my husband since he’s going to be working in the nursery at church tomorrow. Knowing how much I like patterns and prints, he requested a solid color. 😭 I put some flexible wire across the top so it will fit snugly over his nose and he likes it!

That’s us waiting for takeout from our favorite restaurant. Super glad this place has opened back up!

Not sure if we’ll ever stop having masks as normal part of our lives. This virus has changed so much about how we live our lives. In the mean time I hope you all are staying safe and healthy!

God bless,
Linda

DIY Shiplap Photo Wall

Took a break from sewing to work on a woodworking project – a photo wall!  I wanted to build something that was large but portable (that I could break down and fit into my minivan), double-sided (paint on one side and stain on the other) and solid enough that it would stand up on it’s own without the danger of falling over.

DL1A3124

I’m not normally a woodworker so there was a lot to learn!  I learned that ECOS stain and paint are products that I use without the chemical smell bothering me. This is HUGE because I’m sensitive to by most paints and chemicals – the brain fog rolls in first and if I can’t get away, a migraine starts.

DL1A2899

I learned how to use a router. I learned that routers and router bits are sold separately.  I learned that routers are super loud and ear protection is necessary. With each new lesson was a new run to the hardware store so the project took longer than I thought.

DL1A2903

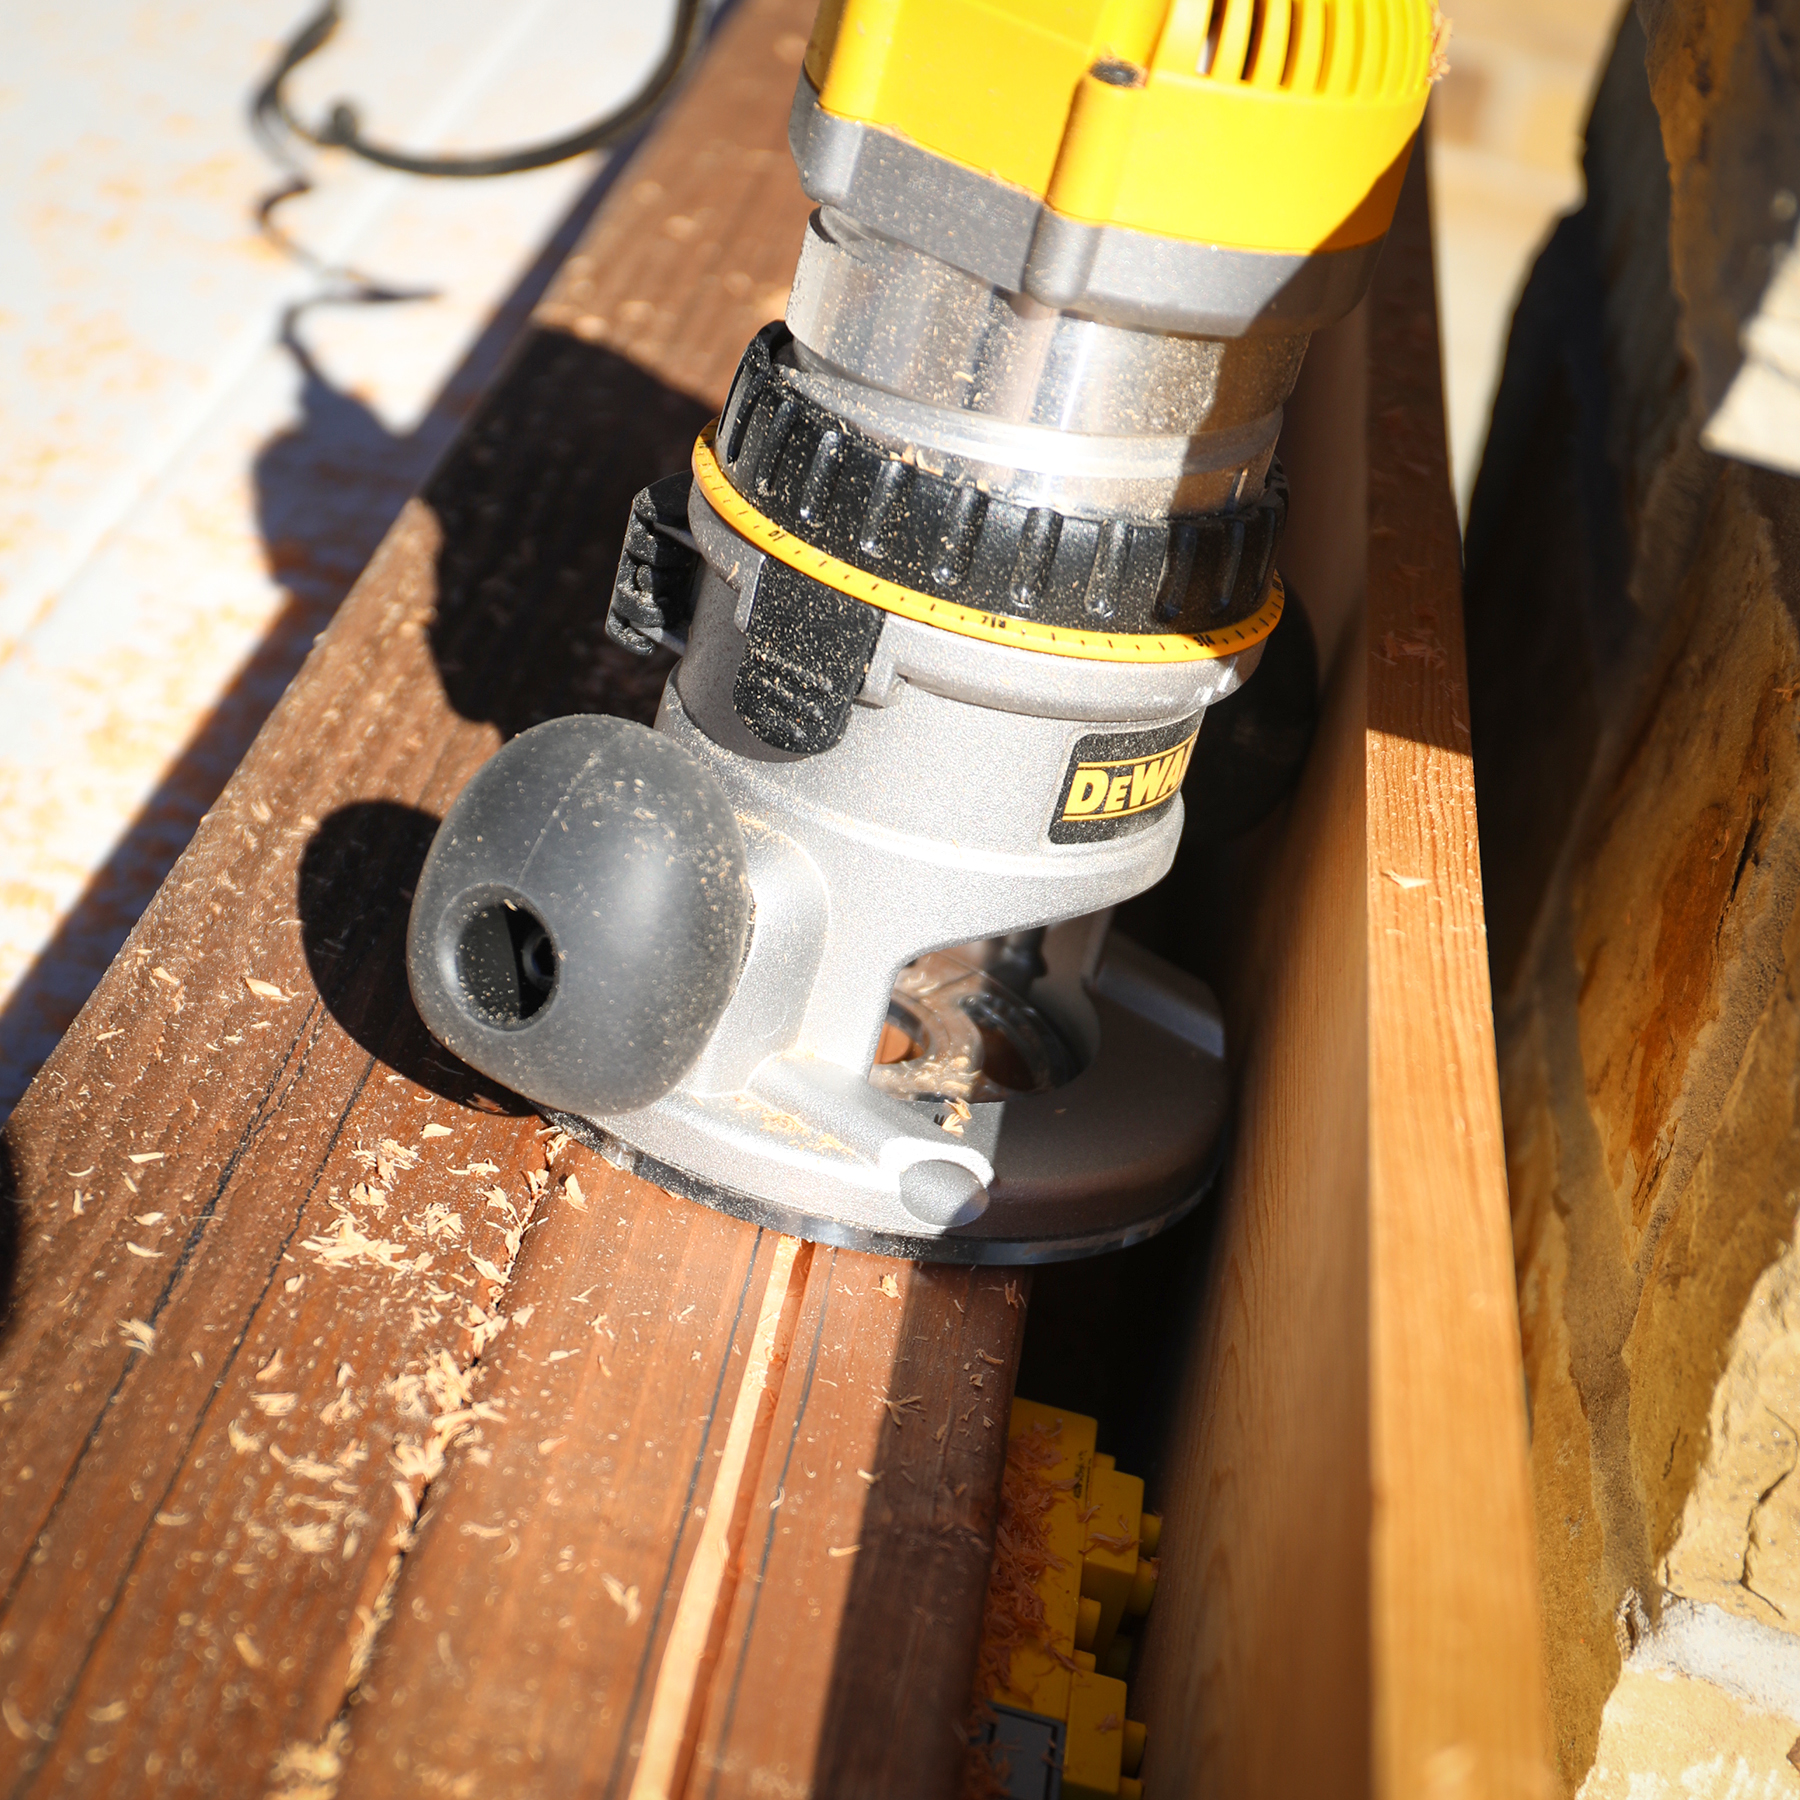
I learned that Legos make pretty good spacers.

DL1A2905

The routing of these 2 channels in the posts took FOREVER.  It was backbreaking work.  If I had a full woodworking shop it would have been easier, but all I had was a router and our outdoor table pushed up against a pillar.  The channels ended up being 7/8″ wide and 1 1/2″ deep.

DL1A2941

I used 4×4 fence posts with metal post bases that were screwed into 2″ x 12″ x 4″ boards to support shiplap.  I used string and Nite Ize CamJam tighteners to keep the posts from leaning outward – one at the top and one at the bottom, strung through screw eyes.

DL1A2939

We had a practice assembly in the backyard to make sure it all went together.

IMG_8078

Then took it to the kid’s Winter Ball for it’s first run.  We strung Christmas lights and garlands over the top and honestly, I couldn’t have asked for a better outcome.

DL1A3103

It was solid and looked fantastic as a photo backdrop!

DL1A3014

For the Fall Ball I’ll flip it around and use the brown-stained side.  I use a photo wall several times a year and now I don’t have to find an open wall to hang a sheet on, I can just assemble this wherever I want, even in the middle of a room!

DL1A3024

Love it when a project comes together!

Supply List:
(All lumber was NOT chemically treated.  I used untreated or kiln-dried/heat treated wood only)

4″ x 4″ x 8′ cedar fence posts x 2
1″ x 8″ x 8′ pine shiplap boards x 14
Simpson Strong-Tie 4×4 post base x 2
2″x 12″ x 8′ board (cut in half for the bases)
Screw eyes x 2
Nite Ize CamJam tighteners x2
1/16″ – 3/16″ rope x 50 feet
Washers and screws to attach the post bases to the base boards x 8

You also may need:
Router (I purchased this one and it worked well for me, but I’m a newbie – I have no idea if this is a good long-term investment!)
Router bit (I got this one, but am not sure if there is a better size to use)
Ear protection
Mask to keep from inhaling all the sawdust
Power drill to screw in the post base
Plyers to screw in the screw eyes
A saw to cut the 2″x 12″ x 8′ board in half
Sand paper or a sander to sand the cut edges of the 2″x 12″ x 8′ board
I think that’s it!  This is by no means a tutorial, but I’d love to hear if you make one!

Pompom Cushions

Love/hate pompoms! Don’t like how they add so much time to the pillow making process, but love how they make the seam nice and stiff and help the cushion hold it’s shape.

pompom cushions.jpg

The fabric is the former nursery bedding for a little girl who is turning 5. I gave it some extra life by turning it into cushions! The final look made the extra pompom work worth it.

Wanna Split a Pineapple?

Okay, okay, so I realize this isn’t the most beautiful looking pineapple softie ever made.  In fact, if I could have bought one on Amazon, I would have. But all the for-sale pineapples out there have smiley faces on them and that just wasn’t what I was looking for.

pineapple1

We have a friend graduating from high school who is a big fan of the TV show PSYCH. While I realize traditional graduation presents are a little more serious, our family decided to go in a more fun direction with our gift: a Psych T-shirt and a pineapple softie.

pineapple2

I used this video as a guideline and it was really helpful, although I had to make some changes to the process when mine didn’t have the shape I was hoping for. Amazon came to the rescue with overnight shipping of a 5-inch needle so that I could use to anchor the top to the bottom. Making something seemingly simple without a pattern is challenging, but is one of the fun things I like about sewing.

Congratulations, class of 2019!

Aurebesh Sweet 16 Birthday Cushion

Aurebesh.jpg

I seriously don’t think a gift could be more perfect.

Our family friend is turning 16.  She is a self-proclaimed Star Wars nerd who can speak Aurebesh.  “What’s Arebesh?” you ask?  It’s that Star Wars language that you can see written on starships, computer screens, and cantina walls in the movies.

I didn’t even know Aurebesh was a thing but I was able to download an Aurebesh font here (free for personal use) and make a template for the number “16” to applique onto the cushion in blue, her favorite color.

I was pressed for time so didn’t do my usual outside border.  The back overlaps and stays closed with a hook and eye clasp.

I hope she loves it!

Blue Patchwork Bag #2

From the quilt top that I quilted but never put backing on I was able to get a second bag.  Bag #1 is here.  I headed back to the tulips before the season was over and my friend shot this.  The tulips make everything look better!

DL1A5428

I made this bag larger – modelling it after a favorite bag of mine that is on it’s last leg.  The patchwork has batting, but the lining does not so it’s a bit more floppy than I like.  But I love the size – it’s big enough to hold all the junk I like to carry with room for an extra camera lens or flash.  It’s already a favorite!

Blue Patchwork Quilted Bag

When you finish making a bag the night before heading off to the tulip farm, you must bring the bag with you.

DL1A5202

When you know you’re going to have some pictures taken, you make sure your dress matches your bag.

DL1A5188

When you realize you’re finished taking pictures of the tulips, you decide to spend a few minutes to do a photoshoot for your new bag.

DL1A5186

I actually started off making a blue baby quilt.  But when it came time to back the quilt I decided to throw the top+batting into the wash and turn it into a couple of bags instead.

DL1A5187

This is bag #1: a sturdy, cute, tote with an interior pocket, and leather straps.  I’m pretty sure bag #2 is going to look similar.

Hula Hoop Reading Tent

What a fun project!

reading tent.jpg

This is for my goddaughter, but she’s away on vacation so I had my schnauzer, Peanut sit in as a model.  Make no mistake, this little guy deserves a little tent for sleeping in for being such a fantastic pet. ❤

The tutorial can be found here.  Of all the hula hoop tent tutorials out there, I thought this one was the cutest and had pretty great instructions.  I couldn’t resist making a few modifications to make the process easier.  I wish that I had made it just a tad tighter around the top so it didn’t look so floppy – I was so scared that it wasn’t going to be wide enough that I overcompensated.  The tent and border are from my goddaughter’s bedding from when she was in a crib.  She’s 4 now and her mom had saved the bedding for a sewing project.  The drapey part is a fitted sheet that I had left over from a previous project so all in all it came together rather cheaply! Always nice when I’m doing a project that requires yards and yards of fabric.

One thing I did learn is that there is double-sided Velcro out there.  Did you all know this? It’s called “One Wrap”.  I used it to keep the hula hoop in place.

This was my spring break project and now that spring break is over, it’s back to my real job: homeschooling the kids.  Happy Spring Y’all!


Aragorn / Strider Costume

My son went to a costume ball this month as Aragorn from Lord of the Rings.  In the movie, Aragorn wears layers upon layers of clothes so we started months before to get all the pieces together.  While there are a few very cool diy Aragorn costume pictures out there (love this one), I couldn’t find anyone who could tell me where to get the parts put together a great costume myself.  So I’m listing what we did below.  We focused on getting all black for the body with a green cape.

T Aragorn.jpg

  • Black long sleeved T-shirt: Soft-Washed Men’s Henley from Old Navy
    I cut out  the buttons to give the V neckline of a medieval tunic, stitching up some raw edges.
  • Black long pants: Slim Built-In Warm Black Jeans (Washed) from Old Navy
    The pants only show from mid thigh to just below the knee.  The focus here was on warmth because it was a winter ball and cold.
  • Tunic: Black Warrior Tunic from Party City
    For $30 this is cheaply made, but it was the right look.  I removed the collar and epaulets and stitched up the raw edges.
  • Boot covers:  Black Pirate Boot Covers from Party City
    $14.99 was a deal compared to $100+ we could have spent on real boots that my son would never wear again.  We didn’t need the pirate flaps so he tucked them into the top and they never popped out.
  • Black Shoes:  My son had these already as his dress-up shoes.
  • Green Elvin Hooded Cloak:  This was my big crafty contribution to the costume.  3 yards of Softened 5.3 oz Linen (Olive Green) from Fabrics-Store.com. 2 yards for the cape (just a big rectangle) and a little under 1 yard for the hood. He was able to slip the cloak on and off over his head.
  • Elven Brooch:  We got this Green Leaf Elvin Pin from Amazon.  Originally I had ordered a cheaper one on Etsy, but when it didn’t arrive after 6 weeks, I turned to Amazon and after 2 days we were set. We pinned the cloak closed with an oversized safety pin and pinned the brooch on top.
  • Arwen’s Evenstar Necklace:  No Aragorn costume is complete without Arwen’s Evenstar Necklace.  It really made the outfit.  Amazon had the best deal again.
  • Leather Bracers:  These really added to the layered effect.  We got these bracers from Amazon.
  • Leather Belt:  We had to have a medieval belt.  Ours was again from Amazon.
  • Hair: All natural!  My son’s been growing his hair out for a few months.  It just happened to go really well with his costume choice!

When it was all said and done this was NOT a cheap costume. It ended up costing more than the ticket to the ball. BUT I have 2 more younger boys and I’m hopeful that they might wear it (or parts of it) when it’s their turn to go to the ball.

Do you have a great Aragorn costume you’ve put together?  I’d love to see it!  Please link it down in the comments.

Quilted Camera Straps in Blue

A sewing project that complements my photography hobby comes full circle when I set up a photoshoot for my sewing hobby project.

camera strap cover blue 1

I made a few more camera strap covers for the shop.  The last ones were all pink but I’m loving blue right now!  After making the straps I started working on a quilt with the same fabrics.

camera strap cover blue 3

I actually prefer sewing things that flow from one project to another instead of working from a set list.  I have a list, but sewing and checking things off of a list isn’t as fun as just letting my hands do what they wanna do.