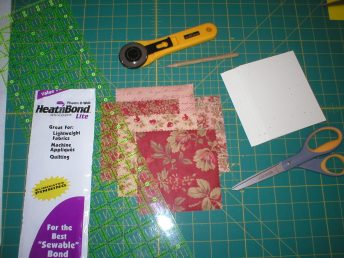
Materials Needed:
- pencil
- several prints from a charm pack (or scraps of fabric)
- fusible webbing (I use Heat ‘n Bond Lite. There are other brands (Wonder Under, Stitch Witchery), but if the glue is too heavy, it can gum up your needle. From several emails, there seems to be some confusion about fusible webbing. It is NOT interfacing. Fusible webbing turns your fabric into an iron-on.)
- cardstock rectangles cut into 4 1/4-inch x 5 1/4-inch rectangles (this is the paper that you will sew the fabric to. Then, this piece will be taped to the front of a card)
- 4 1/2-inch x 5 1/2-inch cards (this is what you get when you cut an 8×11 sheet in half and fold it)
- scissors for cutting paper
- double-sided tape
- rotary cutter (optional)
- cutting mat (optional)
Step 1: Cut out squares of fusible webbing.
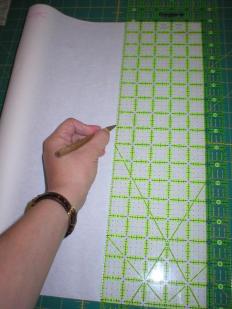
Since fabric in charm packs come in 5-inch x 5-inch pieces, I measure and draw a grid on my fusible webbing just a bit smaller at 4 7/8 inches x 4 7/8 inches.

Cut out the fusible webbing squares with your paper-cutting scissors. The paper will dull your good sewing scissors.
Step 2: Iron fusible webbing to the back of fabric
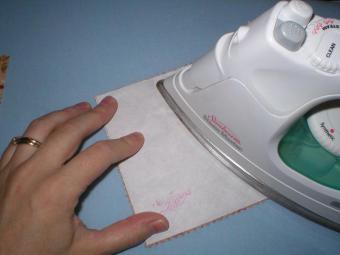
Place the fabric right side DOWN on the ironing board. Place the sticky side of the fusible webbing onto the back of the fabric with the paper side up. Iron on according to fusible webbing instructions (just a few seconds on medium heat in my case).
Step 3: Peel away the paper backing.
Step 4: Cut the fabric into quarters

Cut the fabric into 2 1/2 inch squares
Step 5: Fuse the fabric to the paper rectangles

Make sure when the piece goes off the edge that you don’t fuse the fabric to the ironing board cover.

Pretty soon, you’ll have something that looks like this:
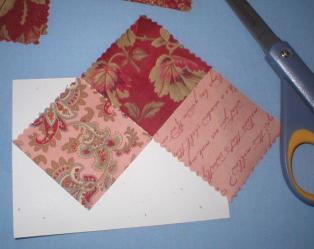
Turn the paper over and trim the extra fabric off.

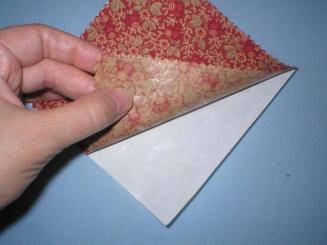
Don’t throw those little pieces away because most of them can be used. For example, this little triangle…
…can go at the top left corner:
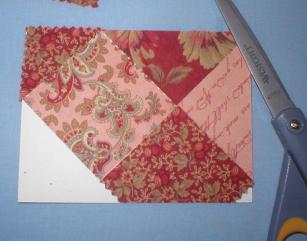
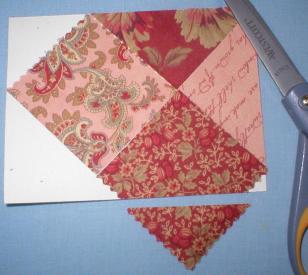
Continue to fuse and trim and iron down the edges until the front of the card is covered. Notice how my peicing isn’t perfect? The decorative stitches will cover up some of these imperfections.
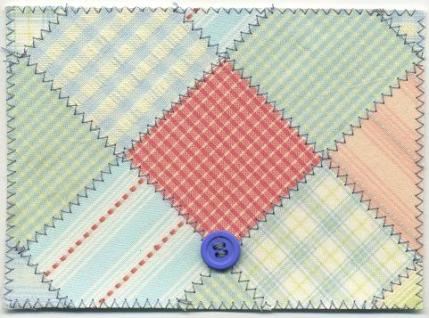
Step 6: Sew decorative stitches onto the “seams”.

I chose a gold thread to go with the fall colors. I like high-contrast threads as well that make the decorative stitches pop.
My favorite stitch these days is the sewn-out zig-zag.
Sewing through paper on a sewing machine will dull the needle. I keep a needle specifically for this purpose and put a sharp one back in when I go back to sewing fabric.
Step 7: Edgestitch the card with a straight stitch.
Step 8 (optional): Embelish with buttons, ribbon, etc.
Step 9: Stick “quilt” to the front of card using double-sided tape.
Here are some samples of other colors and styles:
Faded Memories with blue button.
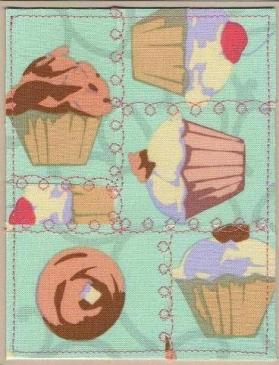
Martha Negley’s Cupcake Fabric with little loop stitches.

April Cornell’s Poetry fabric.
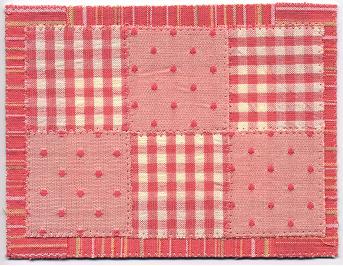
Faded Memories fabric.
Copyright 2006 CraftApple

Thank you for the tutorial. I can’t wait to make some cards. This is the perfect way to use up all of the scraps I have saved.
Thank you, thank you. I love your cards and hope to try them out on Friday. Have to get some fusible web, I think I am out. How fun.
Thank you for the tutorial! I’m adding them to my mental list of crafts I want to make.
I loved your cards so much. I love to stamp and make cards too. I decided to try something similar to yours. I used steam a seam 2 (that’s what I had) and fused the fabric to the card stock, then I made a smaller piece of cardstock and stamped images and words on it. I used that red tape to attach it to the fabric. They turned out ok, not as pretty as yours. I am so glad you did this tutorial! I will try it your way next.
Great tutorial. Very easy to follow. Your cards and crafts are always so cute. Can’t wait to give it a try.
p.s. I am back from my blogging slumber. come visit me again 🙂
Thank you so very much for making this tutorial! I hope I can give it a try tomorrow! Your cards are gorgeous.
Thanks for the tutorial! I think I’ve figured out where I went wrong in my attempts. I’ll give it another go tomorrow and see how it turns out. If all goes well and I can find the camera, I’ll take some shots and send them on to you.
Thanks again!
Wow, the cards look amazing. You make it look so easy with the tutorial, I’ll have to try making some. I especially love the decorative stitching.
I like the idea of creating the card top as a separate piece and attaching it. Excellent tutorial – thanks for sharing!!
Your examples are all really pretty, by the way, and I do mean that. ;0)
Meg
Thanks for the tutorial! This looks like a lot of fun … and good for leftover scraps, too!
Awesome tutorial! I will add this to my growing list of things to make 😉
Thanks for the tutorial!! Those are great step by step pics! I have to pick up my new machine and try this. I really want to make some Christmas cards this way.
I love this! Thank you for showing us how to do it.
Oh, thank you for posting this tutorial. I have seen these cards about and thought they were beautiful, but I didn’t really have a clue where to start. (I’m a VERY beginning quilter, though I’ve sewn for years!). Your tutorial seems very clear, and I’m anxious to try my hand at these!
Wow – I go away for a week and it’s all change round here! Love your new blog look and I’m looking forward to giving this a go!
Okay, this is officially bookmarked. The list keeps growing and growing and growing and…
Thanks!
Linda, this is a wonderful tutorial! I never thought to make them this way.
Thank you so much for doing this tutorial!! All the little details are very helpful. And your examples are beautiful. I have everything now to make them, and the timing is great to get an early start on Christmas cards!
I will email examples of what I do with this 🙂
Allie
those look fabulous!!! thanks for the tute. someday i may have time to try them…
Linda, you have excelled again, your cards are terrific, can’t wait until I have time off to try some.
Have a great weekend
Kerry
These are neat!
GREAT tutorial! Thanks so much. I’ve got a 3-day weekend coming up (two in a row, actually) and this is definitely on my list.
I already have all the supplies – mountains of fabric, wonder under, card stock, buttons, beads and baubles – can’t wait!
Your examples are so pretty and doing wonders for my creative-ness!
Am I closer to 1000 yet?
Thanks for Tute, Linda, will definitely have to try these, they’re lovely.
My goodness, your blog has taken off, hasn’t it? Go you!!!
Listen here missy, I have work to do and you are NOT making it easy for me to stay focused on housework and paperwork and de-cluttering!
This look like fun! And I will have to try them soon!
Thanks for the great tutorial!!
Melissa
I was thrilled that craftzine linked to your tutorial…I wouldn’t have known about your otherwise! 🙂
Guess what I’m doing tonight?
Thanks for the tutorial!
You rock!!! That tutorial kicks butt. Thanks!!!! I love the pictures-you are a woman of many talents. Can I adopt you as my sister?? Please?
I love these! I will have to try!
Beautiful cards. Thank you for the fantastic tutorial.
That’s strange about that craftzine site that used your picture. At least they credited your name and linked to your site. With blogs everywhere these days it seems like many of them do not follow copyright laws at all. It would have been nice for them to e-mail you first, but I would just try to be flattered and not worry about it too much. But if the idea is still bothering you then you should e-mail them, I’m sure they would remove it if you want them to.
Hi,
I loved your quilted card.
Thank you for the great tutorial.
What a great way to use all my fabrics.
Pingback: Stoff-Junkie.de » Blog Archive » Karten - Linkliste
First sorry for my bad grammar.
Thank you for the tutorial, it is great. I think, many people in germany will be interested in it. I set a link to my website and hope, it is ok. Please inform me, if you don’t agree. There are many lists on my website with links to many free projects (some in German and some in English), tutorials and patterns for free.
Thanks
Heike
You did a wonderful job on the tutorial!!!! Embarrassing as it is to admit this, I have never known what the fusible web backing stuff you often describe in the purses you make is.
You succeeded in making it look possible, even for someone like me that can over complicate anything. I was curious about your responses to the craftzine link. Frankly I think it is flattering, but can totally understand a feeling of intrusion on your privacy somehow. Now I think you should get ready for a call from martha stewart! Hope all is well. Summer is coming to a close.
Ok, I said I would try the blanket for my first project, but I think this is more at pace with using my sewing machine for the first time. I must say, I get so nervous that I dont even begin. I enjoy crafting, but when I see all the blogs with all these people doing such great work, I get a little gun-shy. I am going to try this.
thank you for the wonderfully easy looking tutorial. You make it look so easy, therefore making me want to try it.
I hesitate to comment this time, because I am out of my league with this tutorial. (considering I’m not the crafty type) How do you find the time??? Today I spent 5 hours cleaning house, only to find the vacuum isn’t sucking anything; it’s all for naught. Ugh!!!
Beautiful, fabulous cards!!! Would love to get one like that in the mail; I would never toss it out.
I just came her for the first time from another blog link. Pretty cool! It looks like we like the same fabrics. I made a quilt in the Wuthering Heights line & I am in the middle of one with the April Cornell line.
Sandy
can you show the back of the card, since you sew it on the card how does the back look. or what do I do with the back to cover the stitches.
does this sound dumb? i hope you understand wha i mean. tks.
How clever and oh so beautiful! You did a FANTASTIC job with your instructions!!!! Lindie… You should submit that to American Patchwork & Quilting! Do it now! You are one talented lady!
You’ve inspired me to make some cards!
Pingback: A peek behind Lark Studio...
Pingback: Out of Hand » First!
Pingback: Out of Hand » Quilty cards
Pingback: The Giving Flower » Feeling the blogger love
What do you do on a Friday night after work and the kids are away on holidays?
You whip up some of your Quilted Cards.
I made three for Christmas Cards. I think I made the pieces too small. I will change that next time. Thanks for the great tutorial. Very easy to follow.
Such a great idea! I love working with fusible web, its so easy to use. And I’m another sucker for those Moda charm packs. Thank you for sharing!!
Pingback: Today: A Little of Everything « Empty Elizabeth
Here are some cards that I made for a Christmas present. Thanks for the tutorial!
http://abbyweldon.blogspot.com/2006/12/quilted-notecards.html#links
Wow, this is very clear to understand. Thanks a lot. I just purchased a book called (Quilt Designs For Postcards) and want to jump in and try for myself. Your tutorial was great to read.
Pingback: Scrap Happy - More Than 50 Fabric Scraps & Remnant Ideas Plus Free Patterns » TipNut.com
Pingback: Craft Apple's Patchwork Cards Tutorial « my half of the brain
Wow! I love this one too!!! I’m going to include this on on my blog with a link back here. I love it!
Bev
Thank you so much, this is very useful 😀
Pingback: Ideas for truly handmade holiday cards | Do it Yourself
Pingback: Ideas for truly handmade holiday cards | diyblog.info
Great Blog! I will definitly try out your ideas for making cards this year.
Pingback: More stuff. I need more stuff! « I made this
I’m going to give this a go! Thanks so much for your ideas and tutorials. You are an excellent teacher!
Pingback: Winks « Fat Hippy
oh my lord ~ at it again with some amazing ides! WOW. These are so cute and so easy how can help but whip out the machine and make a few of these guys?? thanks again!
Pingback: Friday Links | salty
Pingback: Christmas in August « Fabric Family and Fun
Pingback: Karten - Linkliste (postcards, artist trading cards, carte postale) | Kostenlose Schnittmuster
This is a fabulous idea. Thanks for sharing. I have fussy cut shapes and fused them on to card but did not sew them down. This is a better idea – looks great!
Cheers, Shari
Muito lindo e pratico.
How do you do the back of the post card?
TIA
Deby
Hi Deby,
I take double-sided tape and tape the fabric patchwork to the front of a folding card. Then all the ugly stitching holes are covered and aren’t visible.
I hope this helps!
Linda
Wonderful craft project. 🙂
Pingback: Sew,Mama,Sew! Blog » » November 30 ~ Write It & Wrap It
what a very sweet idea 🙂
Hello, Linda!
This is a very sophisticated way to make cards with fabric! I’m a newcomer to crafting scene, but have played on my own with for example simple cardmaking. I have a difficulty to understand what the fusible webbing is, I’ve never seen it. I hope local (Finnish) craft stores stock it. Or, is it perhaps fabric stores that sell such a thing? How wonderful that there are net stores to combat the problem if it should materialize!
I just finished my Christmas card-project and are heading to the post office tomorrow – mine seem very very simple having seen these, but I’m proud of them and excited about this tutorial. I can see myself enjoying this project a lot! Thank you ever so much for the tutorial and congratulations on creating such a delightful blog. It’s new to me and I’m impressed!
All the best for the Holiday Season,
Kirsti
How cute! I just got a sewing machine and am new to sewing. I need to play with it a little bit though and use some of those stitches.
I found your blog by browsing the net about making a fabric looking quilt card. You’ve given so detailed instructions I had to try and make a card since I’m a quilter, this was perfect.
Thanks for the inspiration.
Pingback: Menu Planner Tutorial « Fabric Family and Fun
Pingback: Scrap Happy - More Than 50 Fabric Scraps & Remnant Ideas Plus Free Patterns | TipWild
Have been on your site and blog for 2 hours at least. You have a beautiful home and adorable family. Thanks for sharing all of your ideas. I need a cinnimon roll now and it really is ALL your fault–HA
Pingback: October 12 Scrap Buster ~ Fabric Cards « Sew,Mama,Sew! Blog
Pingback: Crafty Weekend–Again « My Heritage Fabrics's Blog
Pingback: rainberryblue :: tightwad tuesday: handmade Christmas :: November :: 2009
I first heard of quilted cards just last year and they are such a neat idea. The book at the craft store on how to make them had a high $18.00 price tag.
When you know your card was made by your crafty quilter friend, it feels more personal! These are nicely made & could be made as a favorite pattern block. With a piece of Velcro it could hang on your wall board.
AMEI AS DICAS. VOCÊS SÃO MUITO INTELIGENTES. ACREDITO QUE, DAQUI PARA FRENTE, IREI TRABALHAR NESTE RAMO DE ATIVIDADES. CONTINUEM BRILHANDO SEMPRE, NA CONFECÇÃO DE TANTAS COISAS LINDAS.
ATÉ MAIS, AMIGAS!!! FELICIDADES E SUCESSO!!!
BEIJINHOS
OMG!!! This is awesome!
what a nice tutorial! This will work good for making postcards.
Thanks for the ideas!!
thats the really cool way of making post cards fantastic… really appriciated this toturial…
Pingback: Reading Nook « Fabric Family and Fun
I realize this has been posted for a few years, but this is fantastic! The cards are adorable, we love them! Thank you for sharing your wonderful blog and your enthusiasm for the art of quilting. Check out our blog at: http://www.aqsquiltnews.blogspot.com/
Keep up the beautiful quilting!
I liked this idea so much I made three cards for Mother’s Day this year based on your instructions (you can see the results on my blog at http://bertcollections.blogspot.com/2010/05/mothers-day-diversion-cards.html). I did use fusible webbing/interfacing as the backing and I found this kept the whole patch softer and easie to work with, I then stuck it to a coloured backing card and sewed through the whole thing to fix it on.
I was a bit worried it might not survive the trip in the interstate mail, but my mother, mother-in-law, and grandmother have all assured me that they arrived safely.
Loads of fun to make, and a nice quick project.
Thanks for the inspiration.
Bert
Pingback: Uses for Fabric Scraps « The Humble Nest
thanks for the great idea.love ur site.im going sew this right now.
Love your cards! Haven’t seen the rest of your blogs, but I plan to. And look forward to it!
What a cute idea! Thanks for sharing.
So cute cards, thanks for sharing
I LOVE this idea! I made 2 cards and sent them out today!!
Pingback: Free Sewing Patterns and Tutorials | Everyday Beautiful
Pingback: Comfort « knittedintheheart
Pingback: Hexagon Cards « Craft Apple
I think I’m hooked! What a fun craft to do , and so many different ways you can go with it .. I just made my husband a Valentine’s Day card 🙂 He’s going to LOVE it 🙂 Thank you!!
So glad you like them! They are a bit addictive. 🙂
Love your cards. Have lots of stash & trying to get inspired Little projects are what I enjoy now Thanks for the inspiration, Linda
I was looking for something like this to make unique Christmas cards for the special people on my Christmas card list. This looks like fun.
Just what truly motivated you to post “Patchwork Cards
Tutorial � Craft Apple”? I reallyseriously adored the blog post!
Regards ,Ramonita
Pingback: Winks - fanofstuff.com
Pingback: 6 Fun Quilted Christmas Cards | Free Quilt Patterns
So clever, I mean sew clever
Thank you so much for this article on making my own cards personal. So many choices and I cant wait to start doing some.
I love making the postcards but seem to be having trouble with the post office delivering them….