I am so thankful for technology that makes crafting easier. When I started putting together the daisy applique for my cushion, I started off by arranging different triangles in Publisher: skinny, fat, long, short all in different combinations and numbers.

I finally settled on the last combo (bottom right): 9 of each: fat/long in the back and fat/short in the front.
Instructions below are for the applique on the front of a 16″ x 16″ square cushion. You can finish off the cushion using whatever method you prefer. These are instructions for the front panel applique only.
You will need:
Double-Layer Daisy Applique Pattern Pieces (PDF):
- Cute and colorful version here: Daisy Applique Pattern Pieces color
- Save-your-ink, black & white version here: Daisy Applique Pattern Pieces b&w
1 18″ square piece of fabric for background
1 19″ square piece of batting
Fusible webbing (I prefer Heat ‘n Bond LITE. Do not use Heat ‘n Bond ULTRAHOLD as it can not be sewed through)
Fabric for long triangles
Fabric for short triangles
Scrap of fabric for center circle
Instructions start now.
1) Print pattern pieces. Open file from above and select print on the bottom right of the screen. In the print box, UNselect “fit to page”. Or download file from above and open. Select print and set print to “actual size” or “Custom size: 100%”. Printing on card stock will make everything so much easier. I prefer sturdier shapes that don’t bend and break when I’m tracing them.
2) Cut out pattern pieces.
3) Trace pattern pieces onto fusible webbing.
Trace 9 long triangle pieces onto paper side of fusible webbing. Cut around the outside of the fusible webbing as shown.

Trace 9 short triangle pieces onto paper side of fusible webbing as above.
Trace 1 daisy center circle onto paper side of fusible webbing. Cut around outside, leaving a small border.
4) Fuse webbing onto WRONG side of respective fabrics using the manufacturer’s instructions. DO NOT remove paper backing from fusible webbing.
5) Cut out shapes, using your traced lines. After cutting out shapes, remove paper backing.
6) Make center mark. Find center of 18″ pattern piece by folding fabric in half twice and mark lightly with pencil. Arrange long triangles evenly around center. Fuse to background fabric with iron.

7) Arrange short triangles around center mark. Fuse with iron.

8) Stitch around outsides of short triangles 1/8″ from the edge. Sewing across the center is okay since the stitches will be covered later. 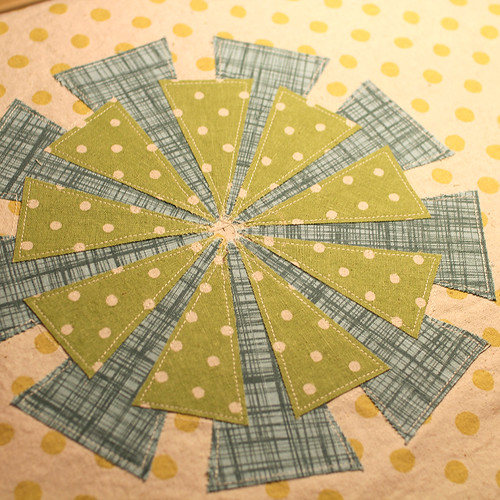
9) Stitch around the exposed edges of the long triangle pieces as shown.
10) Add Daisy Center. Fuse Daisy Center over center of daisy.
11) Center fabric piece over batting and pin in place. Stitch around outside of daisy circle, 1/8″ from the edge, through the batting.
12) Quilt . Use free-motion quilting to secure background fabric to batting.

13) Trim down batting and background to 17″ square, making sure daisy is centered.

There you have it, the front of your double-layer daisy cushion.
Here is a shot of the back. The bonus is that I like the back just as much as the front.

Additional thoughts:
* Depending on the type of batting used, you may not feel comfortable leaving the back of the panel with batting exposed. I use Warm & Natural cotton batting and don’t worry about it falling apart inside the cushion. If you are using a less sturdy batting, then you may want to add backing fabric to the panel before quilting.
*Any questions? I’ll add the answers here.

Great! Love that it’s reversible too. I might try this with some wonderful fabric I found over at http://www.organiccottonplus.com
I will have to try this.
Nice pattern.