This is a great first project for the begining sewer, and makes a great baby gift.
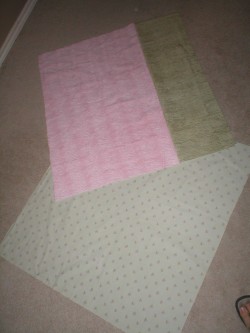
1. You need to start off with 1 piece of chenille cut 36″x36″ and 1 piece of cotton or flannel cut to 36″x36″. For this tutorial, my chenille is actually 2 colors of chenille sewn together and cut to the correct size.
2. Line up the pieces, RIGHT sides together and pin to secure around the outside. Sew with a 1/2″ seam around the entire outside of the square, leaving an 8″ hole in the middle of a side for turning.
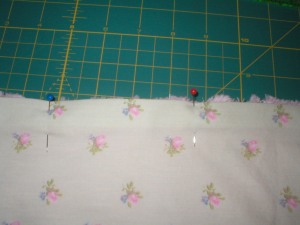
The hole for turning:
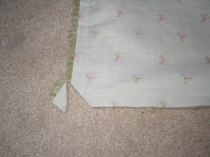
3. Snip the corners. Cut near, but not on the threads making up the corner.
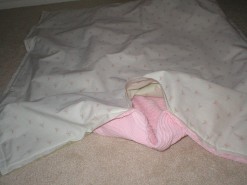
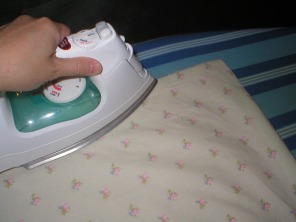
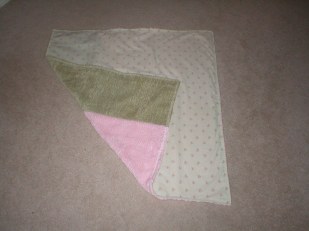
4. Turn the blanket right side out through the hole. Iron a nice, crisp crease into the edges.
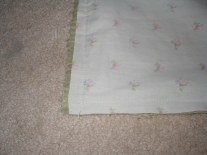
5. Fold over the raw edges of the open hole ~1/2″, iron and pin the openning closed. Set aside.
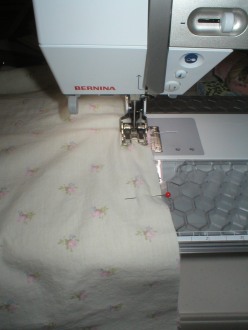
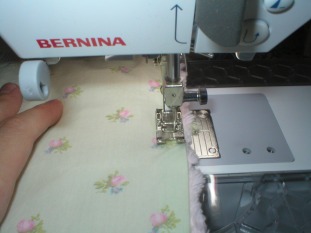
6. Select a decorative stitch to stitch around the outside of the blanket (a zigzag stitch looks nice). Get some scraps of similar fabric layers to practice the stitch, adjusting length and width until you are satisfied with how it looks. This is my practice piece:

7. Sew with your decorative stitch all the way around the outside of the blanket, closing up the hole as you go.
8. Snip threads and YOU’RE DONE!
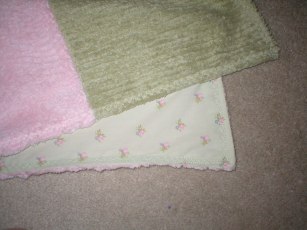
Close up of the decorative stitching:
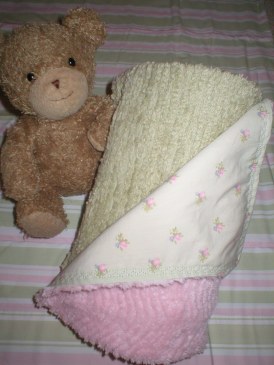
9. Take a nice picture for your blog.
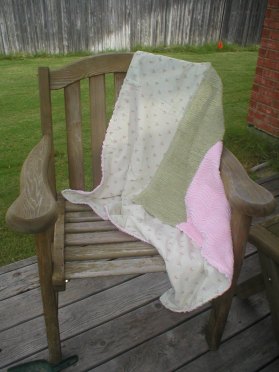
All rolled up and ready for gifting!
Other options:
Instead of chenille on one side, try flannel for both sides.
Try using pre-peiced cotton on one side for a blanket that looks like a quilt.
Tips:
If using a sheet, you may need to anchor the sheet and chenille together in the center. This would be the final step of the process. Some sheets tend to be polished so that they don’t grip the chenille as well as regular cotton fabrics.
See previous post about using a walking foot when sewing with chenille.

Pretty picture for your blog, indeed!
Cute blanket!
I love this. Oh thank you. My husband just gave me a brand new sewing machine for my birthday this past friday. It is my first one and I cant wait to get started on all the possible crafting I could do. This will be my first project. I will start it the first week of August. I cant wait. Thank you so much.
Great tutorial!
Gorgeous blanket!
Lovely blog!
You did a great tutorial. Thank you.
Hi Linda, Very cute blanket–it looks so soft! Do you mind if I link this for my craft post that I do at the HomeschoolBlogger Company Porch? Also, can I use the picture of the finished product? Just let me know!
http://www.homeschoolblogger.com/HSBCompanyBlog/
Randi
Very nicely done. I can follow these instructions! Now to get some chenile. Oh, wait, I must finish painting and cleaning up first. Then get the house on the market.
In the meantime I will look for my chenile and be ready!!!
Thanks so much.
I have that same sheet! lol! I buy sheets A LOT for fabric, and couldn’t pass that one up!
The blanket is beautiful!
Great tutorial! And the blanket is very cute.
I did something similar with a piece of pull on one side so I had a washable dipaer-changing pad on one side and a cozy blanket the other side.. I coud have used your tutorial at that time though.. It is well used but a bit odd.
thanks for sharing. i’ve been wanting to make something new for my baby. i have chenille and some of that dotted minky stuff, which i fear will be hard to sew. i just need to bite the bullet.
(and thanks for your chenille sewing tips, too!)
Hi !
Thanks for this one. I saw your previous post with your favorite patchwork material and thought…I wonder how she did that? I dug in my stash and found some great chenille like material – a little lower profile and some matching flannel. I’m hoping to put them together this week and take a stunning photo for my own blog.
Just in time for baby boy due next month!!!
Blessings,
Shelly
I love the color choices in this tutorial. Green and pink are so delicious together. Makes me think of ice cream. I really enjoyed finding your blog tonight.
Thanks for the tutorial! One question…if I used two pieces of flannel (not ready for chenille yet) and I placed some of that cotton batting (Warm and natural?), do I need to quilt it so it can be washed?
I tried putting a chenille backing on a baby quilt I made one of my nieces a year ago but it didn’t turn out very nicely but my sil kept it still. Now my sil is expecting another baby and I hope to use your tips and tutorial to put together a really nice keepsake quilt this time for her and the new baby. Thanks!
These are great! I have made them as gifts before. Minky works great for the back side, too, and is oh so soft!
Hi there
I’m just curious about blogging. How does one set up a blog site? Which one are you on?
Thank you. Keep up the interesting work and site!
Judi
Hi,
The blanket you made looks as nice as some of the ones we have. Very nice job you make it look possible to do it yourself.
I make these blankets as well, it was so helpful to learn some tips form someone else. Your “lesson:)” was really well written, and great pics. I use minky.
Pingback: Sew,Mama,Sew! Blog » » November 6 ~ Blankets for Baby
Pingback: Baby Blankets are SEW Easy to Make… « THE DOMESTIC DIVA’S DISASTERS™
I finally got around to trying it and it was so much fun! Thanks for posting the tutorial. I’m just a beginner and *even I* could follow along with your instructions!
Pingback: Tipnut’s Picks: 50 Free Projects For Baby » TipNut.com
Pingback: Quick little project. « Craft Apple
thanks for sharing, will have to have a go now!
Pingback: free and three « if thin tastes better, why am i eating chocolate?!
I’ve made several using flannel for both sides and terry cloth/flannel. They turned out beautifully as baby gifts. The adults in my office want me to make some for them.
Hi
Im new to sewing and your tutorial looks like it will easy to follow. one quick question – why do you snip the corners?
Thanks!
Pingback: Good Crafternoon » Things I have cried over since I became pregnant
Oh, this looks so simple to make, but will turn out so nice! This will be a great baby gift!
Pingback: Screaming Fabric « Craft Apple
I actually think I can make this! Thanks for the tutorial! Cute!!
thanks for the tutorial!! I’m all set to give this a go as my first real project! I have a question, though, on average, how much do you spend on chenille per yard?
I just finished a rag baby blanket. (http://iamonly1woman.blogspot.com/2009/03/first-of-many-baby-blankets.html) The next one that I am going to try is one like this. Of course you give great inspiration! Thanks
I used your tutorial to make my first baby blanket. It turned out pretty good for my first time! I was wondering if I could post your website on my blog to go with the picture of my finished blanket. I want to give you credit for the great tutorial!
Thanks!
What a wonderful tutorial.Thank you so much for sharing it with all of us!
Thank YOU soooo much for the great tutoril. my first time ever sewing anything, and I made this little blanket for my four year old, she loves it! my perfectly imperfect first masterpiece! what fun to sew!
I have been looking for easy blanket to compliment the embroidered burp cloths that I give for gifts at baby showers. As a beginner this is really understandable. Thanks for the inspiration. I am off to the fabric store.
My grand daughter has a blanket similar to this that she carries around all the time, however the back of hers is silky and she loves that softness. Would that be hard to sew do you think? I’ve done some sewing, but not real savvy at it…..
Pingback: MamaRama! » Blog Archive » Beatles Baby Blanket!
The blanket turned out to be very nice.Good tips and guidance here.Lovely tutorial here.
Pingback: Simply Said… Shannon of Luvinthemommyhood | Simply Modern Mom
Pingback: My Craft Bookmarks « Notes From The Parsonage
Pingback: Patch work blanket - Arts & Crafts Forum
Pingback: Sewing Tip: Sewing Curves « Craft Apple
Pingback: Free Sewing Patterns and Tutorials | Everyday Beautiful
Thank you for posting! Quick question… Could you also secure the inside of the blanket with some quilting lines? Do you find that it’s necessary to secure the two fabric pieces together?
Thanks again for your help!!!
Do you make T-Shirt quilts? My adult daughter would like one make from her HS t-shirts, but not sure I can do this.
Thank you, natalie
i will be attempting this blanket to give to my best friend for her baby shower it look really simpl. Love the idea hopevit works out for me this beautiful.
By adjusting the snap settings on the front of the diapers you can adjust the fit
as your baby grows. Fill the bucket one-half, to two-thirds of the way up with
water, then add baking soda. A diaper rash can cause
misery to both you and your baby and can worsen if left untreated.
I think i can make it my self at home to gift it a baby.
nice tutorial for Blanket.thanks for sharing tutorial with us.it’s very easy.
Fantastic web site. Lots of useful info here. I am sending it to some buddies ans additionally sharing in delicious.
And obviously, thank you to your sweat!
I have used two sheets together and it working in a more better way with the kids and toy designs in the fabrics.
Link exchange is nothing else except it is simply placing the other person’s
website link on your page at proper place and other person will also do
similar for you.
Pingback: slot machine bonus il mago
Thanks for every other informative blog. The place ekse may just
I get that type of information wditten in such a perfect manner?
I’ve a challenge tha I am simply now opeeating on, annd I have
been at thhe look out for such information.